Showing posts with label the. Show all posts
Showing posts with label the. Show all posts
Sunday, February 23, 2014
The New Shop Pt 2 Moved In
This past week I have been working hard and I have most of my tools moved into my new shop space, its so exciting! First I insulated the walls then put 1/2" plywood up. After that I painted the plywood white with a eggshell latex paint which really made the shop brighter and appear larger after two coats (I still have some touching up to do, but I wanted to get my tools in there).


It feels so good to get my tools in there!
The next few things I am working on are my french cleat system and my lumber rack. I am putting french cleats where ever I can and hanging whatever I can on them. This way everything in my shop can be moved around without much trouble with the only things being permanent on the wall are the lumber rack and the ladder to the attic. You can see where I have already hung a small cabinet and a clamps on my french cleats. The clamps had no where to hang and were taking up valuable space rght off so I made up a quick holder for them. Also, I needed a place to put some fasteners so I made up the small cabinet to hold my hardware.
My lumber rack will be located above the jointer and my unfinished router table. I am making it out of 2x4s and 1/2" plywood, it is pretty simple but should do the job nicely.
Moving into my new shop I will be building lots of new shop furniture and jigs, most of which I will try to make videos on. This afternoon I hope to be able to complete my lumber rack and have a tutorial video made and uploaded by Wednesday. I already have all of the parts cut for the rack I just have to get to videoing!
Read More..
It feels so good to get my tools in there!
The next few things I am working on are my french cleat system and my lumber rack. I am putting french cleats where ever I can and hanging whatever I can on them. This way everything in my shop can be moved around without much trouble with the only things being permanent on the wall are the lumber rack and the ladder to the attic. You can see where I have already hung a small cabinet and a clamps on my french cleats. The clamps had no where to hang and were taking up valuable space rght off so I made up a quick holder for them. Also, I needed a place to put some fasteners so I made up the small cabinet to hold my hardware.
My lumber rack will be located above the jointer and my unfinished router table. I am making it out of 2x4s and 1/2" plywood, it is pretty simple but should do the job nicely.
Moving into my new shop I will be building lots of new shop furniture and jigs, most of which I will try to make videos on. This afternoon I hope to be able to complete my lumber rack and have a tutorial video made and uploaded by Wednesday. I already have all of the parts cut for the rack I just have to get to videoing!

Tuesday, February 11, 2014
The Ply Wooden Boat Part II Planning Materials
The boat they made on GardenFork.tv, which I was using as the basis for my design, was made of a single sheet of plywood. It was about 24” wide with sides about 12” high. Though Eric from GardenFork.tv is a trim guy, his narrow boat road very low in the water when he launched it as a solo passenger. As I wanted to be able to take my kids (and even other adults) in the boat with me, I decided I would need two (2) sheets of plywood.
With this as a plan, I headed straight to Lowes once we were settled in at Lake George (and I was back from the trip to Fine Woodworking Live I made immediately after arriving).
Since the ¼” luan I used on the mock boat was awfully damn thin, and the plywood bottom would need to support me, I opted to use ⅜” CDX plywood. Though it was bowed and coarsely textured as most CDX is, I felt it provided me the best mix of strength, weight and cost. For the battens, I chose to switch to 2”x2”, so the tips of the screws wouldn’t poke through the ¾” thickness of the 1”x used in the mock boat. I also bought some 2”x4”, metal saw horse brackets and a small drop cloth so I could work at a comfortable height and keep the mess in check.
In the parking lot, I had to rip down the 4’x8’ sheets of plywood before they would fit inside my truck. This being upstate New York, there was no problem woodworking in the parking lot.
More (Ply)Wood Boat Posts.
Read More..
 |
| Yep, thats what a boat looks like before its put in the water. |
 |
| Ready for ripping! |
More (Ply)Wood Boat Posts.
Monday, February 10, 2014
A House In The Trees Part XII
After a stalled few weeks of Tree House building due to Woodworking in America and Hurricane Sandy, I managed to get back out to work last week.
After cutting all the T1-11 sheathing/siding to length, I managed to get 2-1/2 walls hung. Hopefully next weekend Ill get to finish closing in the envelope.
Read More..
After cutting all the T1-11 sheathing/siding to length, I managed to get 2-1/2 walls hung. Hopefully next weekend Ill get to finish closing in the envelope.
For more Tree House posts, click here.
Tuesday, January 28, 2014
update on the george the third style table
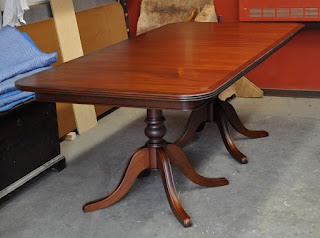
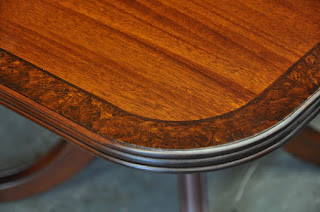
a close up of the walnut and burl edge detail

early in the stain/finish process

a view of the bottom

and a photo of the the original, larger, expanding,version that we made waaaay back in 1991 ...
Friday, January 24, 2014
The Unplugged Summer Part Two
Drilling Holes in a Perfectly Fine Bench Top
Drilling holes in a perfectly fine bench top can be as scary as you make it; Ive been using this style bench at my shop in Toronto and have come to find Im much more comfortable hand planing stock with it sitting freely on the bench top surface butted up against a thin baton of hardwood. No tail vise or hold-fasts just the weight and the balance of my arms and the hand plane working together. (There are of course exceptions with this rule like cross grain work with a scrub plane) This, my summer bench has never been equipped with dog holes so now, before I get any further along with this dovetailed box project Ill need to get out the brace and bit and make some cheese.

In the shot above you can see where I placed my bench dog holes; this is my comfort zone and its what works for me. Id suggest clamping a baton across your bench top and see wheres right for you. Maybe clamping a baton across the bench will always be enough for you and youll never have to scar your work bench...in my world I dont mind a few holes in the work surface.

So with that I carefully draw a square line and mark with an awl the locations. I also mark off a hole in the block on my front shoulder vise; this is used sometimes to hold small pieces across the bench top. Ill probably add three more holes in line with the left hand side of the vise, but for today these three will suffice. (Make sure before you start boring youre not in line with the vice bolt or screw!!)

Im using a couple of Bench Pups from Veritas; theyre the round brass type 2 3/8" long. I also use a pair of the 4 3/8" ones but theyre still sitting all snug in the holes on my bench top back in the city.

With the third hole drilled Im ready to get back to work and surfacing the four pieces of the project is next on the list. As mentioned Ill lay a thin baton of hardwood across the bench top and work the boards flat, checking as I go.

My shop made winding sticks also made the journey home and theyre the perfect tool for the job of checking this Khaya for any humps, valleys or wind.

In no time at all Im back on the shooting board taking incredible shavings in the end grain. The 5 1/2 is a wonderful shooting plane and this minimal shooting board is working out better than I anticipated. (Just to answer the inevitable now instead of later...no-I wont be getting rid of my fancy shooting board back in Toronto nor will I stop using my dedicated No. 9 Iron Miter plane! This is good and working well but that duo are the cats ass when shooting)

Four pieces, square and smooth Ill sit them on the bench top and take a few steps back. Im already thinking about adding to the design, perhaps a small frame to hold the carcass? Theres still some long skinny strips of Khaya and will think more of the piece while Im marking out the dovetails.

The Tite-Mark again finds its way into my hand- this time the perfect application. Im laying out simple through dovetails, nothing too fancy, I am still on vacation over here!

I like to clamp both pieces together when I lay out my tails as seen in the next photo below...This will obviously insure continuity between the top and the bottom and will speed up the process a little as well.

I walk the dividers across the tail board and draw in the lines with a pencil and my dovetail marker. Youll notice that I divide the board into seven even sections and then when I start sawing Ill skip the middle one. This is something Ive been doing lately, (perhaps a nod to my Krenov admiration?) I love the look the two trios of tails make. (my tool chest and small wall cabinet I made for my book projects also had this same treatment) With that its time to cut dovetails and my small rip saw seems to really like this hardwood. Khaya is a great wood for hand tool work except sometimes when hand planing. The ribbons in the wood grain can reverse and bend which in turn can result in tear-out. This is easily remedied by some sanding in the final stages but Im hoping to avoid it if I can.

The tails are cut first in my world but you can start with the pins if youre so inclined. From dovetail saw to fret saw I wander and in no time at all Im reaching for some chisels to clean out the waste. My detail chisels which I cant say enough about are always close by.

With the tails cut and clean its a good time to break for the night; were having a campfire and I better get some kindling together. The beauty of the wood shop-always lots of waste to get a good campfire going...

...Morning comes fast and first up is to transfer the tails over to my pin board; I use a thin Paul Bebee knife to reach deep into the corners. You may have noticed I didnt use the 140 trick when beginning these dovetails Im not sure why I didnt other than to say I may have been thinking this little project was destined for the wood shop. If this was a drawer for a client then I would have cut the shallow rabbets into the inside end of the tail board to make life easier when transferring the lines over. (if youve never heard of the 140 trick then you have some homework for tonight...look back through my older posts to find the method)

Again from the dovetail saw to fret saw dance Im back to the chiseling and ready for a dry fit.

At this point the box is ready for glue; Ive been thinking about the long strips of Khaya left in the off cut pile. Maybe a frame assembly to cradle the box? A trestle type affair dictated by the stock in question. In my work space Im able to create and design without any guidelines or rules save the lumber Ive chosen (perhaps foolishly) to work with. Sometimes the pencil and paper are better left on the shelf and we can meander through this creative process with only the wood to guide us. It can be quite liberating stumbling through a building process when time is our only real investment. Ive been enjoying myself over these past two days and really most of my time was given to setting up the work space. The hardwood owes me nothing but Im going to do my best to lure it into some form I can call my own. A cantilevered box over a thin double trestle?
This evening Ill do some more measuring and continue a little further on, down the path.
For now though...theres an old crow waiting hungrily, from his perch in yonder tree...

Read More..
Drilling holes in a perfectly fine bench top can be as scary as you make it; Ive been using this style bench at my shop in Toronto and have come to find Im much more comfortable hand planing stock with it sitting freely on the bench top surface butted up against a thin baton of hardwood. No tail vise or hold-fasts just the weight and the balance of my arms and the hand plane working together. (There are of course exceptions with this rule like cross grain work with a scrub plane) This, my summer bench has never been equipped with dog holes so now, before I get any further along with this dovetailed box project Ill need to get out the brace and bit and make some cheese.
In the shot above you can see where I placed my bench dog holes; this is my comfort zone and its what works for me. Id suggest clamping a baton across your bench top and see wheres right for you. Maybe clamping a baton across the bench will always be enough for you and youll never have to scar your work bench...in my world I dont mind a few holes in the work surface.
So with that I carefully draw a square line and mark with an awl the locations. I also mark off a hole in the block on my front shoulder vise; this is used sometimes to hold small pieces across the bench top. Ill probably add three more holes in line with the left hand side of the vise, but for today these three will suffice. (Make sure before you start boring youre not in line with the vice bolt or screw!!)
Im using a couple of Bench Pups from Veritas; theyre the round brass type 2 3/8" long. I also use a pair of the 4 3/8" ones but theyre still sitting all snug in the holes on my bench top back in the city.
With the third hole drilled Im ready to get back to work and surfacing the four pieces of the project is next on the list. As mentioned Ill lay a thin baton of hardwood across the bench top and work the boards flat, checking as I go.
My shop made winding sticks also made the journey home and theyre the perfect tool for the job of checking this Khaya for any humps, valleys or wind.
In no time at all Im back on the shooting board taking incredible shavings in the end grain. The 5 1/2 is a wonderful shooting plane and this minimal shooting board is working out better than I anticipated. (Just to answer the inevitable now instead of later...no-I wont be getting rid of my fancy shooting board back in Toronto nor will I stop using my dedicated No. 9 Iron Miter plane! This is good and working well but that duo are the cats ass when shooting)
Four pieces, square and smooth Ill sit them on the bench top and take a few steps back. Im already thinking about adding to the design, perhaps a small frame to hold the carcass? Theres still some long skinny strips of Khaya and will think more of the piece while Im marking out the dovetails.
The Tite-Mark again finds its way into my hand- this time the perfect application. Im laying out simple through dovetails, nothing too fancy, I am still on vacation over here!
I like to clamp both pieces together when I lay out my tails as seen in the next photo below...This will obviously insure continuity between the top and the bottom and will speed up the process a little as well.
I walk the dividers across the tail board and draw in the lines with a pencil and my dovetail marker. Youll notice that I divide the board into seven even sections and then when I start sawing Ill skip the middle one. This is something Ive been doing lately, (perhaps a nod to my Krenov admiration?) I love the look the two trios of tails make. (my tool chest and small wall cabinet I made for my book projects also had this same treatment) With that its time to cut dovetails and my small rip saw seems to really like this hardwood. Khaya is a great wood for hand tool work except sometimes when hand planing. The ribbons in the wood grain can reverse and bend which in turn can result in tear-out. This is easily remedied by some sanding in the final stages but Im hoping to avoid it if I can.
The tails are cut first in my world but you can start with the pins if youre so inclined. From dovetail saw to fret saw I wander and in no time at all Im reaching for some chisels to clean out the waste. My detail chisels which I cant say enough about are always close by.
With the tails cut and clean its a good time to break for the night; were having a campfire and I better get some kindling together. The beauty of the wood shop-always lots of waste to get a good campfire going...
...Morning comes fast and first up is to transfer the tails over to my pin board; I use a thin Paul Bebee knife to reach deep into the corners. You may have noticed I didnt use the 140 trick when beginning these dovetails Im not sure why I didnt other than to say I may have been thinking this little project was destined for the wood shop. If this was a drawer for a client then I would have cut the shallow rabbets into the inside end of the tail board to make life easier when transferring the lines over. (if youve never heard of the 140 trick then you have some homework for tonight...look back through my older posts to find the method)
Again from the dovetail saw to fret saw dance Im back to the chiseling and ready for a dry fit.
At this point the box is ready for glue; Ive been thinking about the long strips of Khaya left in the off cut pile. Maybe a frame assembly to cradle the box? A trestle type affair dictated by the stock in question. In my work space Im able to create and design without any guidelines or rules save the lumber Ive chosen (perhaps foolishly) to work with. Sometimes the pencil and paper are better left on the shelf and we can meander through this creative process with only the wood to guide us. It can be quite liberating stumbling through a building process when time is our only real investment. Ive been enjoying myself over these past two days and really most of my time was given to setting up the work space. The hardwood owes me nothing but Im going to do my best to lure it into some form I can call my own. A cantilevered box over a thin double trestle?
This evening Ill do some more measuring and continue a little further on, down the path.
For now though...theres an old crow waiting hungrily, from his perch in yonder tree...
Wednesday, January 22, 2014
The Partners Desk Leaves Tomorrow
 Well, the house is finally finished and the desk will be on its way to its new home tomorrow. We finished it up a few weeks ago but we were waiting for the carpenters to finish, the hardware to arrive and the ok for delivery. All set now and ready to go except for a small adjustment that I see I need to make to the bottom file drawer face ... Its amazing what you dont see until you look at the photographs closely. Anyway ... no problem well take care of it in the morning before the shipper arrives ... A nice use of the 30" wide mahogany boards, if I do say so myself ... Good job boys .... Click the photos to enlarge them ...
 Close up of the very nice handmade hardware by Richard Spreda, The Stowe Smith/
 Drawers like this on both sides, 3/16ths by 1/2" brass hanging file supports in the bottom drawers. There is also a removable butterfly grommet (not shown in the file) for cord passage to the surge protector in the center below the kneehole ... The cord from that travels between the drawers and plugs into the wall that the desk will be placed up against ... More drawings, comments and construction photos from the original post here ...
Subscribe to:
Posts (Atom)