Showing posts with label update. Show all posts
Showing posts with label update. Show all posts
Thursday, February 13, 2014
New Yankee Workshop workbench update
I was able to get quite a bit of work done on the bench this weekend. On Saturday I fixed all my dado mistakes and assembled the frame. On Sunday I was able to get all the plywood and hardboard cut down to their proper sizes. This post will cover the building of the frame and I will cover the plywood on the next one.


Read More..
I did a dry fit of the leg assembly and discovered that I made the dados for the bottom shelf on the wrong side.
I used an existing leg to mark out the cuts on the new ones.
I made sure to mark where I needed to hog out the material this time.
I also rebuilt the dog assembly. I had left the dado stack set at 1/2" when it was supposed to be 3/8" deep and I made them the size of a 2x4 wide instead of 1". I also left out the dog holes at each end because I couldnt properly hold the pieces when I was cutting them the first time and it wasnt very safe. Im sure this will come back to haunt me.
I cut a piece of 2x4 on the mitre saw at 4 degrees to use to set my mitre fence when I cut the dog holes.
There was no mention of this piece in the plan on the NYW book so I marked the corresponding piece to the right and then cut this one. It turns out that I made it 1/4" too long. When I dry fit it together I could not get this part of the assembly to fit square.
It took me a while to figure out that my mistake was in using this mark to measure the size of the new piece. I made the mark in the middle of the board which was 3/4" when I needed to account for the depth of the dado which was 1/2".
The new legs are ready to go! I am going to use the old ones to build an outfeed table for my table saw.
I cut 1/4" off the crossmember.
Now everything fits and is square.
I also cut the groove in the rear 2x4 for the tool tray. It doesnt say anywhere in the book but I think that I am going to have to notch the plywood 1/4" to account for the ends of the 2x4s.
Glued, screwed, and flipped upside down. Time to install the legs.
Almost ready for the bottom shelf.
The first leg has been glued and screwed in. I used my carpenters triangle to square it up first.
The bottom shelf and foot assembly is done.
Its starting to look like a bench!
Tuesday, January 28, 2014
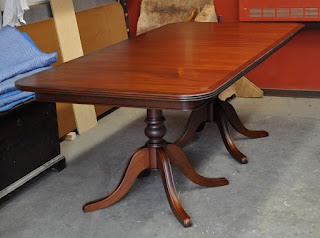
update on the george the third style table
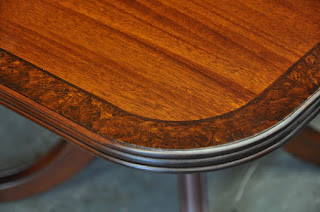
a close up of the walnut and burl edge detail

early in the stain/finish process

a view of the bottom

and a photo of the the original, larger, expanding,version that we made waaaay back in 1991 ...
Subscribe to:
Posts (Atom)